

Disclosure: Attempting trips in the backcountry requires experience and skill, especially with young kids in tow. Please only attempt what you are capable of and always be prepared. This Mom Bikes attempts to keep this route information as current as possible but always check trail reports and weather before leaving, and expect things to change suddenly in the mountains. This Mom Bikes is not responsible for your safety.
This is my list of local pipe dreams and missions accomplished! I will link to any posts that I have written up about specific rides or bikepacking trips, which usually include notes on elevation profiles, camping option(s), and our experiences as a family (including the ages of the kids and what they were riding). After pining over European bike vacations, I’ve begun to realize that we have so many wonderful trips to be had right in our very own backyard, with no expensive flights or jetlagged children to enjoy; miles to work out the kinks and refine our joy, within an hour or two’s drive from Calgary.
These trips are pretty much all double track or gravel road, but car-free. We don’t really have the set-up (yet!) to get us into the realm of singletrack rides, but next year our youngest should be old enough to ride a trail-a-bike, so our options might open up to more “real” mountain biking.
Wondering what to bring on trips like this? Check out my family-friendly packing list.
Contents
Cascade Valley
- Start/End: Upper Bankhead Parking Lot
- Route type: Out-and-back
- Campground: Cascade Bridge Backcountry Campground (Cr6), Banff National Park
- Distance (one-way): ~6.5 km
- First trip: August 2017
- Subsequent trips: August 2019
- Terrain: This route is on the Cascade Fire Road. There is one short but steep climb and descent, initially (and know that there is nothing steeper after that!), proceeded by about a 2.5 km long, steady ascent up the valley, as can be seen on this elevation profile. The trail gently undulates after that, rolling past some pretty wetlands and when you hit a real descent you know that you are dropping down to Cascade River and are a few minutes from Cr6 which is located on your left, just after the bridge. See complete trip report for more details.
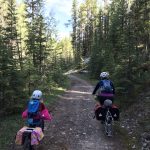
- Notes specific to kids: When we did our trip to Cr6, our youngest enjoyed her last day of being 2 years old and our eldest was a few weeks shy of 6. The baby in the family rode on the back of the Edgerunner in the Hooptie and sometimes with her dad on the Haul-a-Day in the Whoopie-Deux, both setups use an Xtracycle cushion. We had the Yepp on the back of the Edgerunner in case she decided to doze off, but that didn’t happen. Our eldest rode her new-that-week Frog 55 and she could ride a lot of the long incline with lots of breaks and candy incentives, with a huge grin on her face the whole time (I was so proud). She needs a few more teeth on her granny gear to spin a bit more freely and tire less easily (or a smaller chainring in front… I need to see which is more feasible). We fashioned a fork-mount on the back of the Haul-a-Day for her bike when she needed a break, and then she’d catch a ride with mum or dad.
- Highlights: For the kids, very likely running into pack horses! Especially the spot where they forge the Cascade River, right beside the eating area of the campground. Very cool. Camping by the river was delightful. While it might not be the most beautiful of fire roads because you are in a pretty steep valley and can’t see out much, there are some stunning little wetlands (which I adore), the campground is a worthy destination, and the rip down the next morning is super fun (just check your speed with kids!).
Map
Time required
With loaded adult bikes, two young kids, and lots of rest stops, I’d budget at least 2-3 hours to get in the almost 6.5 km to Cr6. Give yourself an extra hour to allow for breakdowns (from bikes or kids). Expect the return trip to be much faster!
Trip extension ideas
Go all the way up the Cascade Fire Road
We haven’t done it yet, but this can be made into a longer distance trip or a two-nighter by incorporating backcountry campground Cr15 “Stoney Creek” into your plans. Bikes are not permitted past Stoney Creek (which is directly before the campground), so you’ll have to walk them at this point (or lock them up on the bike-friendly side of the bridge). FYI as of Spring 2018, Cr15 was in dire need of repairs.
When I did this trip a second time with two other adults in August 2019, we ditched our gear at Cr6 and then rode up almost all the way to Cr 15, just for kicks. Definitely recommend that if you have the daylight/energy to do so.
Start in Banff for a longer trip to Cr6
For my kid-free version of this trip, we started in Banff. We rode the Legacy Trail towards Canmore but turned left to go under the highway to Cascade Ponds. From there you can link up to the Bankhead Trail, an easy singletrack mountain bike trail that is lovely (especially when compared to riding on the road here).
It ends at the old Bankhead Town Site where, unfortunately, you have push your bike up a few sets of stairs — this would be challenging with loaded long tails, bike trailers, or small kids, in general (but doable if you’re determined and have an extra set of hands or two, or you could cut-out to the road earlier). Hopefully one day the Bankhead Town Site will be made accessible to all visitors which will also improve its bike connection to the road.
Then we rode along the road for a couple hundred metres (if that), then turned left into the Upper Bankhead Parking Lot. This section of the road does have traffic, if that concerns you. Take the lane; we found most people driving were courteous. This is a short but steeper stretch of road, FYI.
Goat Creek — Legacy Loop
- Start: Goat Creek Trailhead
- End: Canmore (or Goat Creek if you shuttle)
- Route type: loop (plus optional shuttle)
- Campground: Mount Rundle Backcountry (Sp6), Banff National Park
- Distance: Day 1 ~14 km ; Day 2 ~34 km
- First trip: July 2018
- Terrain: See complete trip report for more details
- Notes specific to kids: We rode this route with our then 6.5 year old riding independently except we used the FollowMe Tandem on the Legacy Trail so that we could go faster. There were two other kids in our group: our then 3.5 year old who rode on the back on our Haul-a-Day longtail an an 18 month old who mostly rode in a Yepp rear seat (but had the option to go in a Thule Chariot trailer). Parts of Goat Creek Fire Road were challenging for the kid riding especially at first, but she did it, just slowly. There were some solid climbs for her; I would bike ahead, run back downhill, and then walk up with her, pushing her bike, to help keep things light. Also, I highly recommend sending an adult up from Canmore to Goat Creek to fetch cars and not riding back up that busy, dusty grunt of a hill with kids; at the very least, ditch them at the Nordic Centre with another adult.
- Highlights: An almost completely car-free loop close to home, in Canada! Such a treat. Gorgeous scenery. Fun to stop in Banff for brunch (felt very fancy and European). It was all pretty rad!

Map
Tips
We started at the Goat Creek Trailhead above Canmore, rode “down” to Mount Rundle Backcountry (Sp6) in Banff National Park, camped, had coffee, rode into Banff for brunch at Wild Flour, then ripped back along the Legacy Trail to Canmore. We did not ride back up the busy and dusty Smith-Dorien to the trailhead and were fortunate to not have to set up a shuttle as my mum lives in Canmore and was around so she was kind enough to drive two drivers back up the hill to grab our cars. With kids, I would recommend a shuttle or send a strong rider to retrieve the car.
This ride is perfect when finished with a refreshing dip in Quarry Lake! Here is the link to the full trip report with more details!

And, here is some winter inspiration for an out-and-back along Goat Creek to Sp6. Tricky for an older kid, but done with grace! Which, to me, speaks volumes about this kid and that this is a very family-friendly option for summertime.
Spray River
- Start/End: Spray River parking lot (behind Banff Springs)
- Route type: out-and-back (or loop)
- Campground: Mount Rundle Backcountry (Sp6), Banff National Park
- Distance (one-way): 6.2 km (up Spray West side to then down Spray East ~100 m to campground)
- First trip: August 2019
- Terrain: Spray River West Fire Road is in the best shape of all of the fire roads I’ve ridden in the area. Relatively smooth, minimal flood damage from 2013.
- Notes specific to kids: A great beginner backcountry trip.
- Highlights: Easy access, close to Banff, quick in even for our two-family group with small kids (~45 mins).
Map
Loop idea
If you start in the parking lot just past the Banff Springs Hotel and ride to the campground, you can go back the way you came or keep riding down Spray River East. Spray River East is the side we took for our Goat Creek—Legacy Loop and it is a nice trail, but more trail than fire road these days and has some noticeable flood damage. Still doable with kids if you’d like to make it a loop but just not as much of a mountain highway as the eastern side is. I had planned to do the loop but the other family we were with wanted to go back the way we came because it was so nice and I could hardly argue with that!

Goat Creek Parking Lot to Spray West, via High Rockies Trail
This route would start in the Goat Creek Parking Lot, again, but this time heading up the new High Rockies Trail section of The Great Trail (aka the Transcanada Trail), riding to Spray Lakes West Campground. This trail is not yet on GoogleMaps but there is a map link here. It appears that this route would be a little over 10 km, one way.
The next morning you can ride and out-and-back along Spray West fire road (it’s stunning and highly recommended). Click here to see photos from our day trip doing that route. If you are advanced riders and want a much longer day-trip, then go out on Spray West and come back on the High Rockies Trail (or vice-versa). Then ride back to Goat Creek or stay another night and ride back in the morning.
Goat Pond to Spray West, via High Rockies Trail
A shorter version of the above. Instead, park at Goat Pond and connect in to the High Rockies Trail, then ride about 3.8 km on the trail to Spray West, and continue for a few hundred metres more to the campground. This is the best map link I’ve found. It appears that this route would be a little over 4 km, one way.
In fact, this would be a pretty amazing first trip where you could even “cheat” and have a car parked with the bulk of your gear at the campground…!
Redearth Creek
- Start/End: Redearth Creek Parking Lot (off the Transcanada Highway)
- Route type: out-and-back
- Campground: Lost Horse Creek Backcountry Campground (Re6), Banff National Park
- Distance (one-way): ~7.5 km
- First trip: Summer 2013
- Terrain: Redearth Creek Fire Road is in decent shape because Shadow Lake Lodge uses it. However, there was significant flood damage when we were last there (2013, the summer after the spring flood). I imagine much of this has been fixed up by now since it’s a fairly high use corridor.
- Notes specific to kids: A slog fully loaded on the way up. But worth it! If your kid is riding, gears are definitely recommended, or a trailing bike.
- Highlights: Ability to do a day trip to Shadow Lake (ride up to where you can’t ride any further, lock up, then hike up to the lake along a magical trail). Leave gear in bear lockers (except for what you need for the day trip) and pick it up on your way back down.
This was our first ever bikepacking trip before we even really knew what “bikepacking” was: Summer 2013. We rode our old mountain bikes in, borrowed a BOB trailer, had a couple of panniers, and pulled our 22 month old toddler in our single Chariot. It was quite the slog. But, we did it!!! We made it to backcountry campground Re6 (“Lost Horse Creek”) and set up camp. And, then it was so very dark with clouds. I was thinking, ‘what the heck are we going to do with the three of us crammed in a tent in a torrential downpour for the next 12+ hours?’ So, after a little marital dischord, we packed up, zipped down the fire road in very good time, loaded up our gear into the car, turned onto the highway, and then it POURED. Buckets and buckets of rain. Vindicated, we ordered pizza from Rocky Mountain Flatbread as soon as we had cell service, picked it up on our way through Canmore and went home.

We successfully repeated this trip as a day trip a few weeks later and it was great. We rode up past Re6 to as far as you can go up this fire road by bike. Locked up the bikes. Switched the toddler into our hiking pack and walked in to Shadow Lake. Beautiful. Then we walked out, zipped back down the hill, and went home. It’s about 21 km return trip, doing this. Our dog was tired after her half marathon!
I’d like to try this trip again without kids or when the kids are both on geared bikes and decent at climbing.
Elbow Loop Area
There is one complete loop in this region or you can go clockwise from Little Elbow (frontcountry campground/staging area) to Big Elbow Backcountry Campground; or, counterclockwise from Little Elbow to Mount Romulus Backcountry Campground. Tombstone Backcountry is located between those two campgrounds if you want a longer out and back or an alternate place to stay while doing the full loop. Some people ride the full loop as a mountain bike day trip.
If you are looking for a first bikepacking trip, this is a good place to start. (Not as easy as Spray River though.) The trip in to Big Elbow is a bit shorter but with some coarse, flood-damaged sections; a little more challenging for timid kids on narrow tires, but doable for many (including my eldest). The road into Romulus is longer but generally in better condition and I know a 4.5 year old who has ridden the whole way in and only walked some sections of some hills, all on her Frog 52 (she’s badass).
Little Elbow to Romulus
- Start/End: Little Elbow Day Use Area/Parking
- Route type: out-and-back
- Campground: Mount Romulus Backcountry Campground,
- Distance (one-way): ~14 km
- First trip: September 2017
- Subsequent trips: August 2019
- Terrain: Fire road with minimal flood damage (as marked in trip report, mostly limited to low spots/wash outs from creeks that have been coarsely repaired). Undulating terrain with an overall ascent to the campground. Beautiful.
- Notes specific to kids: You will likely have a lot of walking up hills. But, know that a 4.5 kid rode the whole route on her geared Frog 52 and only walked parts of the hills; she always rode as far as she could and got back on again as soon as possible: it was inspiring! This is a good first trip, not the easiest, but there is lots of rideable terrain for youngsters.
- Highlights: The campground. The bridge crossing Little Elbow River. The trail itself has some sections with stunning views.
Riding out on an old fire road, “Little Elbow Trail” to Mount Romulus backcountry campground, almost 12 km, one way. Access is from Little Elbow Campground area (which adds another 1.8 km to the trip). The trip could take anywhere from 1 to 5 hours depending on your ability, fitness, load, if you’re travelling with kids or in a big group! It took our group of ten families about 3 hours or so.
Check out the trip report link for lots of details and know that this route has a wonderful day trip option of riding to the bridge and back — super family-friendly.
We’ve done this overnighter two times now, it’s great.
Little Elbow to Tombstone
We are going to save this one for when the kids are a bit bigger, I think. It can be done in one longer ~20 km day or could be broken up into two days with a night at Big Elbow backcountry campground or coming in from the other direction along Little Elbow and staying at Romulus.
Little Elbow to Big Elbow
- Start/End: Little Elbow Day Use Area/Parking
- Route type: out-and-back
- Campground: Big Elbow Backcountry
- Distance (one-way): ~9 km
- First trip: June 2018
- Subsequent trips: June 2018, July 2019
- Terrain: Fire road with large remedied washed-out sections (so bigger rubbly rock). The wider your tires the better but we have friends who’ve ridden it with their city bikes.
- Notes specific to kids: If your kid is timid, they will likely not be a fan of the more coarse sections. Candy and positivity help immensely! Our eldest has ridden it multiple times all by herself, some times faster than others, depending on her mood and peer group.
- Highlights: I love the view at the campground and the wide expanse while riding over some of the washed out bits. There is also this false-flat section that can be filled with wildflowers that’s a gem.
We did this trip twice in June 2018, and again in Summer 2019 and it is great as an out-and-back. On both trips there were families who had never been bikepacking before and they had fun doing it! So much so that we have since done another trip with one of the families — I think that speaks pretty highly of the adventure! It is the perfect balance of easy yet challenging enough for younger kids that they get an immense degree of satisfaction from completing the journey.

You can read my complete write-up here with more details and pictures.
The Complete Loop
A multi-day trip with kids. This is a great way to break down this trip into more kid-sized nuggets of distance.
Lake Minnewanka
This route has restrictions for time of year that you can ride it (closed to bikes from July 10 to September 15) and this post has great inspiration. I think we will save this one for when the kids are a bit older, too, as we don’t currently have a setup that will work and the trail is definitely more technical than what they’re used to. Currently, it’s just a fun mountain bike ride for our family!
Jewell Bay
- Start/End: Barrier Dam Parking Lot
- Route type: out-and-back
- Campground: Jewell Bay Backcountry, Bow Valley Provincial Park (Note: Closed Apr 15- Jun 15 for elk movement)
- Distance (one-way): ~4.7 km
- First trip: September 2019
- Terrain: Read the full trip report as there are several slightly different routes to get there. What I call the “High Route” is in the best shape and is part beautiful singletrack, and part fire/access road that is in good to great shape, overall.
- Notes specific to kids: Hero singletrack and fairly easygoing fire/access road riding make for a good trip! The campground is also very good with kids with a big area to play.
- Highlights: Close to town, a decent first trip (aside from any possible navigational issues), and a gorgeous campground.
I really enjoyed this trip, it was a nice low elevation option for fall. The lake was stunning, it was easy to get to, and I really enjoyed the campground.
Extension
I will definitely be going back here and aspire to try riding all the way to Ribbon Creek Hostel in Summer 2020. See the full trip report for other longer (more advanced) ride ideas to get to this backcountry campground.
A little further afield…
There are more bits that I want to ride along the Kettle Valley Railway and related sections, more day trips as well as multiday adventures like this one.
I’d like to learn more about Alberta’s Iron Horse Trail up North…
I’m currently researching the Crowsnest Community Trail in Crowsnest Pass and contemplating doing an out-and-back overnighter on this ~23 km route, adding in some ice cream, a mine tour, visiting the Frank Slide Interpretive Centre… and either camping at one end or grabbing a hotel or similar.
I’m also looking into ideas for Castle Provincial Park and Cypress Hills Provincial Park.
Stay tuned!
More from my site


Some of these trips sound great. We have 3 littles, eldest is 5 and he likes to bike. I think getting into burrowing would be great but what gear do you bring?
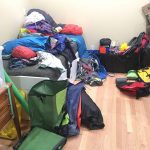
Great question! In essence, it’s the same gear as backpacking, except you need to carry some basic bike tools (pump, patch kit, multi-tool including chain break, spare tube, etc.). Keep your eyes peeled for a write-up on this or you can scan my Instagram feed for our a picture of our packing list… hmm, let’s see if I can find it… we essentially brought this (if morphed a bit from this list as we ended up doing a shorter trip): https://www.instagram.com/p/BXD82SIHhRS/?taken-by=our100acrewood
Here’s a complete packing list! https://thismombikes.net/the-ultimate-bikepacking-gear-list-for-families/
We have done the Spray Loop a bunch of times, usually in winter. It is indeed kid-friendly bikepacking. Last winter we went for New Years and later Fiona guided a trip with a couple of my friends down Goat Creek to SP6 and back (see coldbike.com). The campground is about 100m from the turn-around bridge, on the east side of the river and the eating area about 300m further from the bridge. Still no map, but I also took Fiona there in Feb 2014, I only advise it in winter, but fatbiking in to Sundance Lodge or BW10 is family challenging-but-friendly. In summer, the trail is about ankle deep in horse manure and mud. The trail is trackset for skiing, so that is an option as well.
Also, the very awesome Megan Dunn talks about packing here: http://evilmoose.me/?p=6120
Awesome, Doug, thanks! Updating the post right now to include most of the links. I’m not sure I ever considered myself a winter camper but not I’m getting curious because there are so many of these trips that I still want to do and next summer is feeling very far away at this point, ha!
Winter has the advantages of no bugs, few bears, no crowds, and fresh milk.
Also from Megan, one of her Minnewanka trips: http://evilmoose.me/?p=6098
Also, in my rush to help you find the campground, I forgot to mention how much I like this piece. It gives a nice overview of some great options near here.
Thanks! Des has been saying there are lots of great-looking options up Jasper way, too? More exploring to be had once we’ve checked out most of these options.
There is also a rail trail (not as back country nor as non-motorized as I would prefer) https://ironhorsetrail.ca/ in Alberta and Saskatchewan now has the Boreal trail http://www.tourismsaskatchewan.com/things-to-do/trails/105242/meadow-lake-provincial-park-boreal-trail (allows bikes)